Explore expert insights, tips, and best practices to optimize your IT operations
Tap into a wealth of knowledge from your peers, industry experts, and the ControlUp team, deepening your understanding of ControlUp products and solutions.
ControlUp helps IT teams address common digital workplace experience challenges, no matter their use cases or existing technologies.
ControlUp offers a rich set of capabilities to improve the digital experience for employees using any desktop, any application, anywhere.
Explore expert insights, tips, and best practices to optimize your IT operations
Tap into a wealth of knowledge from your peers, industry experts, and the ControlUp team, deepening your understanding of ControlUp products and solutions.
A global organization of technology professionals transforming the desktop monitoring marketplace.

Setup
To create an API key, click your profile icon and select API Key Management. Then click on create new and select how long the API key is valid for and save the key. Make sure to save the key and keep it secure.Using the API Reference Site
We’ve updated the API reference website (https://api.controlup.io/reference/how-to-use-the-edge-dx-api) to include all the new endpoints accessible with your API key. The site also features a built-in tester that automatically generates code in various languages, including Bash, PowerShell, Node.js, JavaScript, Python, and more. For example, if you want to list all available device tags, simply navigate to https://api.controlup.io/reference/list-device-tags. On the right-hand side, under Credentials, paste your API key, select PowerShell, and click Try It! This will generate a PowerShell script for you, execute it, and return the response. Armed with this knowledge, let’s examine some use cases and see how we can use these capabilities.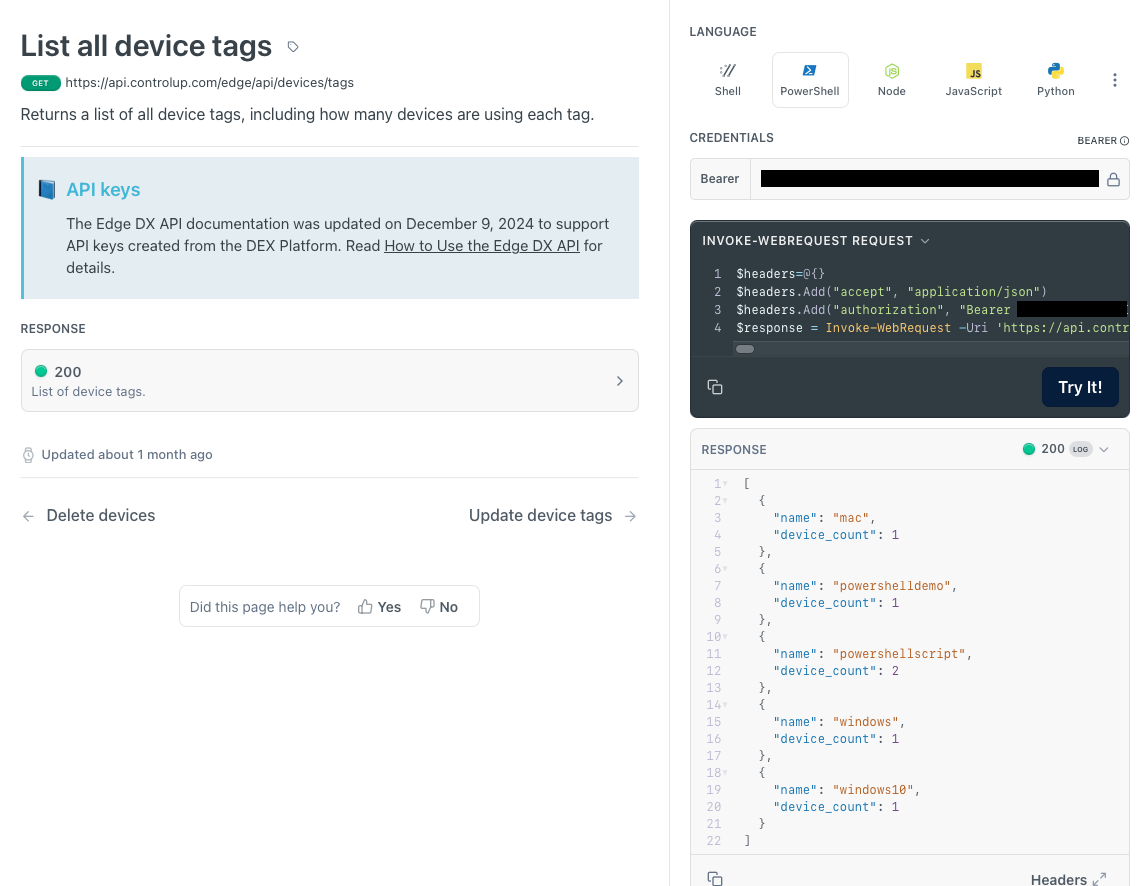
Use Case 1: Automatic Setting Device Tags
Device tags are incredibly useful for grouping devices efficiently. When deploying the ControlUp for Desktops Agent using platforms like Microsoft Endpoint Manager (Intune), new tags aren’t automatically added as new devices are deployed. To ensure these new devices are assigned the correct tags, you can create a PowerShell script to run periodically (e.g., once daily) to add the appropriate tags to new devices. For this example, we’ll use the following API endpoints: List Devices: To retrieve all devices in your ControlUp for Desktops environment. Update Tags: To assign or update tags for devices. The first step is to create a PowerShell function to get all ControlUp for Desktops devices. This function will store the data in a parameter called $devices, including details such as the device name, ID, platform, last communication, and tags. ($apikey will need to contain your API Key).# get EdgeDX devices
function Get-EdgeDxDevices {
param (
[Parameter(Mandatory = $true)]
[string]$ApiKey
)
$baseUrl = "https://api.controlup.com/edge/api" # Base URL
$endpoint = "devices"
$method = "GET"
$headers = @{
"Authorization" = "Bearer $ApiKey"
"Content-Type" = "application/json"
}
$url = "$baseUrl/$endpoint"
try {
# Invoke the API to get the list of devices
$response = Invoke-RestMethod -Uri $url -Method $method -Headers $headers
return $response
} catch {
throw "Error invoking API: $_"
}
}
$devices = (Get-EdgeDxDevices -ApiKey $apikey).rows | Select-Object -Property Name,_id,_platform_name_friendly,last_communication,tags
$devices
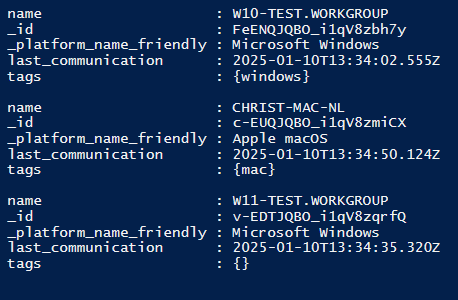 In this demo, we’ve identified that the agent W11-TEST.WORKGROUP is missing tags. To address this, we’ll assign it the windows tag.
To achieve this, we’ll incorporate a bit of script logic to:
In this demo, we’ve identified that the agent W11-TEST.WORKGROUP is missing tags. To address this, we’ll assign it the windows tag.
To achieve this, we’ll incorporate a bit of script logic to:
- Identify Devices Missing Tags: Filter out devices with no tags assigned.
- Verify the Platform: Ensure the agent is a Windows machine by checking the platform field from the device data.
$deviceIDs = @($devices | Where-Object { -not $_.tags -and $_._platform_name_friendly -eq "Microsoft Windows"})._id
#Update EdgeDX Devices Tags
function Update-EdgeDxDeviceTags {
    [CmdletBinding(DefaultParameterSetName = "CreateTags")]
    param (
        [Parameter(Mandatory = $true)]
        [string]$ApiKey,             # API key provided by the user
        [Parameter(Mandatory = $true)]
        [string[]]$DeviceIds,        # Array of device IDs to update
        [Parameter(Mandatory = $true)]
        [string[]]$Tags,             # The tags to update
        [Parameter(Mandatory = $true, ParameterSetName = "CreateTags")]
        [switch]$Create,             # Specify this switch to create tags
        [Parameter(Mandatory = $true, ParameterSetName = "DeleteTags")]
        [switch]$Delete              # Specify this switch to delete tags
    )


    # Determine the action based on the parameter set
    $action = if ($PSCmdlet.ParameterSetName -eq "CreateTags") {
        "create"
    } elseif ($PSCmdlet.ParameterSetName -eq "DeleteTags") {
        "delete"
    } else {
        throw "Unexpected parameter set."
    }


    # Validate tags
    $invalidTags = $Tags | Where-Object { -not ($_ -match '^[a-z0-9\-_ ]{1,150}$') }
    if ($invalidTags) {
        throw "Invalid tag(s) provided: $($invalidTags -join ', '). Tags may contain only: a-z, 0-9, -, _, spaces, and must be 1-150 characters long."
    }


    # Build the request body
    $body = @{
        "action" = $action
        "ids"    = $DeviceIds
        "tags"   = $Tags
    }


    # Base URL and endpoint
    $baseUrl = "https://api.controlup.com/edge/api"
    $endpoint = "devices/tags"
    $url = "$baseUrl/$endpoint"


    # Headers with API key
    $headers = @{
        "Authorization" = "Bearer $ApiKey"
        "Content-Type"  = "application/json"
    }


    try {
        # Make the API call
        $jsonBody = $body | ConvertTo-Json -Compress -Depth 2
        $response = Invoke-RestMethod -Uri $url -Method "POST" -Headers $headers -Body $jsonBody


        # Extract device details from the response and display them
        foreach ($device in $response) {
            Write-Output "Device $($device.name) now has these tags: $($device.tags -join ', ')"
        }
    } catch {
        throw "Error invoking API: $_"
    }
}


Update-EdgeDxDeviceTags -ApiKey $apikey -DeviceIds $deviceIDs -Tags "windows" -Create

Use Case 2: Automatic Setting Device Group
A second use case for leveraging PowerShell and the API is assigning a device group. While a device can have multiple tags, it can belong to only one group at a time. A group can represent a location, department, or any categorization that fits your use case. It’s possible to automatically assign a group during client installation using the /GROUP switch in the installer. However, a practical use case for a script would be updating or changing the group if needed, such as a department moving to a new location or a device being assigned to a new department. You can reuse the Get-EdgeDxDevices logic from the previous script, apply your own filtering criteria to identify the relevant device IDs, and then execute the following script to update the groups accordingly.# set EdgeDX Device Groups
function Set-EdgeDxDeviceGroups {
param (
[Parameter(Mandatory = $true)]
[string]$ApiKey, # API key provided by the user
[Parameter(Mandatory = $true)]
[string]$GroupName, # The name of the group to assign devices to
[Parameter(Mandatory = $true)]
[string[]]$DeviceIds # Array of device IDs to associate with the group
)
# Build the request body
$body = @{
"group" = $GroupName
"device_ids" = $DeviceIds
}
# Base URL and endpoint
$baseUrl = "https://api.controlup.com/edge/api"
$endpoint = "devices/set-group"
$url = "$baseUrl/$endpoint"
# Headers with API key
$headers = @{
"Authorization" = "Bearer $ApiKey"
"Content-Type" = "application/json"
}
try {
# Make the API call
$jsonBody = $body | ConvertTo-Json -Compress -Depth 2
$response = Invoke-RestMethod -Uri $url -Method "POST" -Headers $headers -Body $jsonBody
return $response
} catch {
throw "Error invoking API: $_"
}
}
Set-EdgeDxDeviceGroups -ApiKey $apikey -GroupName "Amsterdam" -DeviceIds $deviceIDs
Use Case 3: Automatic Removal of Old Devices
The final use case we’ll demonstrate is the removal of outdated devices. If devices have been offline for 60 days, for example, we might want to remove them from ControlUp for Desktops to maintain a clean and organized console. Another reason could be that your organization is busy with replacing obsolete Windows 10 devices with new Windows 11 devices. (Did you know? That ControlUp can identify devices that can’t be upgraded!) For this, we can once again use the get-EdgeDxDevices function to retrieve the device list. We can then filter it to identify devices that have not communicated in the last 60 days and extract their device IDs.# Define the current date
$currentDate = Get-Date
# Define the threshold for communication
$thresholdDate = $currentDate.AddDays(-60) #fill in the number of days of no communication
# Filter devices with no communication in the last X days
$filteredDevices = $devices | Where-Object {
-not $_.last_communication -or ([datetime]::Parse($_.last_communication) -lt $thresholdDate)
}
$filteredDevices
$deviceIDs = @($filteredDevices)._id
function Remove-EdgeDxDevice {
    param (
        [Parameter(Mandatory = $true)]
        [string]$ApiKey,           # API key provided by the user
        [Parameter(Mandatory = $true)]
        [array]$DeviceIds          # Array of device IDs to delete
    )


    # Build the body
    $body = @{
        "device_ids" = $DeviceIds
    }


    # Base URL and endpoint
    $baseUrl = "https://api.controlup.com/edge/api"
    $endpoint = "devices/delete"
    $url = "$baseUrl/$endpoint"


    # Headers with API key
    $headers = @{
        "Authorization" = "Bearer $ApiKey"
        "Content-Type"  = "application/json"
    }


    try {
        # Make the API call
        $jsonBody = $body | ConvertTo-Json -Compress -Depth 2
        $response = Invoke-RestMethod -Uri $url -Method "POST" -Headers $headers -Body $jsonBody


        return $response
    } catch {
        throw "Error invoking API: $_"
    }
}


Remove-EdgeDxDevice -ApiKey $apikey -DeviceIds $deviceIDs
Conclusion
There are countless use cases where automating tasks or gathering data can be instrumental. With the new ControlUp for Desktops API, you now have the tools to start creating these solutions yourself. If you have any questions or would like to explore other use cases and need assistance, feel free to contact me via email at Chris.Twiest@controlup.com.Important Security Reminder: Protect Your API Key
Following on from the remarks above, here’s a critical reminder: keep your API key secure and confidential. The API key has admin-level privileges, allowing access to all data in your ControlUp for Desktops environment and enabling management tasks. We strongly recommend against hardcoding your API key as plain text in PowerShell scripts. Instead, consider the following best practices:- Use a key management system like Azure Key Vault to store and retrieve your API key securely.
- Create a script that prompts the user for the API key at runtime and passes it as a parameter.
# Define a function to create the message box
function Get-ApiKey {
    Add-Type -AssemblyName System.Windows.Forms


    # Create a form for the input
    $form = New-Object System.Windows.Forms.Form
    $form.Text = "Enter API Key"
    $form.Size = New-Object System.Drawing.Size(400, 150)
    $form.StartPosition = "CenterScreen"


    # Create a label
    $label = New-Object System.Windows.Forms.Label
    $label.Text = "Please enter your API key:"
    $label.AutoSize = $true
    $label.Location = New-Object System.Drawing.Point(10, 10)
    $form.Controls.Add($label)


    # Create a textbox for the input
    $textBox = New-Object System.Windows.Forms.TextBox
    $textBox.Location = New-Object System.Drawing.Point(10, 40)
    $textBox.Width = 360
    $form.Controls.Add($textBox)


    # Create an OK button
    $okButton = New-Object System.Windows.Forms.Button
    $okButton.Text = "OK"
    $okButton.Location = New-Object System.Drawing.Point(300, 70)
    $okButton.Add_Click({ $form.Close() })
    $form.Controls.Add($okButton)


    # Show the form
    $form.ShowDialog() | Out-Null


    # Return the input from the textbox
    return $textBox.Text
}


# Call the function and save the API key
$ApiKey = Get-ApiKey